Monday, December 30, 2013
You can get this beauty and many others SOON from Arthur Crowe.
Keep an eye on his store for all the new releases coming.


Sunday, December 29, 2013
This Tutorial was Written By Me. Any Similarities are Coincidental.
Please do not Claim my Tutorials As Your Own.
These Tutorials are for Everyone to Try.
If you want to post my tuts in your PSP Groups, please post a text link back to this site.

SUPPLIES
I used photoshop cs6 but any version should do.
Mask by dangerously delicious designz
Font of choice
Let's get started!
Open a new canvas 800 x 800
Open Festive Winter Elements (96)
Place in the center of your canvas.
Add drop shadow.
Open Festive Winter Elements (23)
Place on top of element 96
Add drop shadow.
Open your tube.
Re-size as desired and sharpen.
Add drop shadow.
Place on top of the word art Joy.
Add drop shadow.
Place on top of the word art Joy.
Open Festive Winter Elements (43)
Place behind your tube.
Open Festive Winter Elements (82)
Place in the front bottom right side of your tag.
Re-size as desired and sharpen.
Add drop shadow.
Open Festive Winter Elements (93)
Place in the front bottom left side of your tag.
Re-size as desired and sharpen.
Add drop shadow.
Open Festive Winter Elements (81)
Place in the back left side of your tag.
Re-size as desired and sharpen.
Add drop shadow.
Open Festive Winter Elements (86)
Place in the back right side of your tag.
Re-size as desired and sharpen.
Add drop shadow.
Open Festive Winter Elements (72)
Place in the back center/right side of your tag.
Re-size as desired and sharpen.
Add drop shadow.
Open Festive Winter Elements (116)
Re-size as desired and sharpen.
Duplicate and place on either side of your tag.
Add drop shadow.
Open Festive Winter Elements (66)
Re-size as desired and sharpen.
Add drop shadow and place in the
center front of your tag.
Now add your mask.
I used Festive Winter Papers (8) on mine.
I added the filter Xero Porcelain.
Use the default settings ONLY changing the blue to 0%
Add your name, copyright, save and you're done!
Thank you for following along!
From 12/29 -12/31. Spend any $ in store and get this awesome celebration girl special layer tube. This tube is not just for this new year but comes with 2014,2015,2016 plus blank layers so you can add your own text and years.


Friday, December 27, 2013


Thursday, December 26, 2013
12/26 - 12/28 Spend any $$ in store and add this to your cart for free!
This is a wonderful special layers of the cute sweater tube. You get many color layers she is such a great tube not to be missed. We hope you are having a happy and warm holiday season. More fun to come!


Tuesday, December 24, 2013

Monday, December 23, 2013

Sunday, December 22, 2013

Saturday, December 21, 2013
"Sweet Bear" is available now at PFD.
Check her and all of the other new release from Alfadesire out now!


Friday, December 20, 2013
This Tutorial was Written By Me. Any Similarities are Coincidental.
Please do not Claim my Tutorials As Your Own.
These Tutorials are for Everyone to Try.
If you want to post my tuts in your PSP Groups, please post a text link back to this site.

SUPPLIES
I used photoshop cs6 but any version should do.
Tube "Yeti Girl" by Alfadesire
FTU Kit "Christmas Cerise" by A Taggers Scrap
Template "460" by Millie's PSP Madness
Mask by dangerously delicious designz
Font of choice
Let's get started!
Open template
Apply these papers to the layers listed below.
Use the clipping mask.
ctrl + alt + G
1 - atspaper8
2 - atspaper9
3 - atspaper4
4 - atspaper5
5 - atspaper6
6 - atspaper10
Once you have the papers as you like Merge them with
the layers you have clipped them to.
I also duplicate mine and add clear layer styles for extra shine and pop.
Add drop shadows.
Now open your tube and position as desired.
Re-size as desired and sharpen.
Add drop shadow.
Open atsstars1
Place behind your tube layer
Position on the right side of your template.
Re-size as desired and sharpen.
Add drop shadow.
Open atsbauble
Place on the bottom right side of your template.
Re-size as desired and sharpen.
Add drop shadow.
Open atsbauble2
Repeat steps above.
Open atsbranch3
Place behind layer 6.
Flip horizontal and add drop shadow.
Flip horizontal and add drop shadow.
Open atsribbon2
Place across the bottom of your template
Add drop shadow.
Open atsbranch2
Place so that your tube is sitting on top of it.
Add drop shadow.
Open atssleigh1
Re-size as desired and sharpen.
Add drop shadow.
Place in the center of your tag over layer 6.
Open atstree4
Place on the far right side of your template.
Re-size as desired and sharpen.
Add drop shadow.
Rotate slightly to the right.
Now add your mask.
I used atspaper10 on mine.
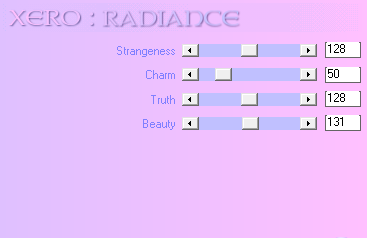
I added the filter Xero Radiance.
My settings are pictured below.
Now add your name using font of choice.
Open atsgemflake
Add drop shadow and duplicate.
Place on either side of you name.
Add your copyright, save and you're done!
Thank you for following along!


Thursday, December 19, 2013


Tuesday, December 17, 2013


Monday, December 16, 2013
This Tutorial was Written By Me. Any Similarities are Coincidental.
Please do not Claim my Tutorials As Your Own.
These Tutorials are for Everyone to Try.
If you want to post my tuts in your PSP Groups, please post a text link back to this site.

SUPPLIES
I used photoshop cs6 but any version should do.
Font of choice
Let's get started!
Open template
Apply these papers to the layers listed below.
Use the clipping mask.
ctrl + alt + G
1 - Holiday Magic Papers (35)
2 - Holiday Magic Papers (47)
3 - Holiday Magic Papers (5)
4 - Holiday Magic Papers (3)
5 - Holiday Magic Papers (36)
6 - Holiday Magic Papers (34)
7 - Style of Choice
2 - Holiday Magic Papers (47)
3 - Holiday Magic Papers (5)
4 - Holiday Magic Papers (3)
5 - Holiday Magic Papers (36)
6 - Holiday Magic Papers (34)
7 - Style of Choice
Once you have the papers as you like Merge them with
the layers you have clipped them to.
I also duplicate mine and add clear layer styles for extra shine and pop.
Add drop shadows.
Now open your tube and place center on your template.
Re-size as desired and sharpen.
Add drop shadow.
Place behind layer 6.
Open Holiday Magic Elements (128)
Place behind layer 4.
Flip 90 and duplicate.
Place so that each end is sticking out from behind
layer 4.
Flip 90 and duplicate.
Place so that each end is sticking out from behind
layer 4.
Add drop shadow.
Open Holiday Magic Elements (35) & Holiday Magic Elements (14)
Repeat the steps above.
Open Holiday Magic Elements (18)
Re-size as desired and sharpen.
Add drop shadow.
Duplicate and place on either side of your tube.
Add drop shadow.
Duplicate and place on either side of your tube.
Open Holiday Magic Elements (22)
Re-size as desired and sharpen.
Add drop shadow.
Duplicate and place on either side of your tube.
Open Holiday Magic Elements (61)
Place behind layer 6.
Dup as many times as you like and cluster around the outside
of the circle. Re-size as desired and sharpen.
Add drop shadow.
Open Holiday Magic Elements (117)
Re-size as desired and sharpen.
Add drop shadow.
Duplicate and place on either side of your tube.
Add drop shadow.
Duplicate and place on either side of your tube.
Open Holiday Magic Elements (118)
Repeat steps above.
Now add your mask.
I used Holiday Magic Papers (2) on mine.
I added the filter Xero Radiance.
My settings are pictured below.
Add your name, copyright, save and you're done!
Thank you for following along!


Saturday, December 14, 2013
Welcome to the fantastically free blog train!
I have a freebie Christmas kit for you.

Check out the rest of the stops below!
This gorgeous tube & matching kit are loaded with layer options!
keep an eye out on his store for this new release and
many more coming soon!


Friday, December 13, 2013
This beautiful tube comes with a bunch of layer options
so you will use her again and again.
She is available now at PFD.
This stunning kit is "December" from Bookworm Dezines.
It has 45 elements and 12 papers.
You can pick it up now at Scrap Candy.


Subscribe to:
Posts
(Atom)


Where I sell!


